




The first time our power went out for real, I had half a jar of peanut butter and a sleeve of crackers. That was it. Three days later I swore I’d never be caught like that again.
So I figured out how to actually do this. Not the bunker stuff. Just a good emergency food supply that sits quietly in a closet until the day a storm, a layoff, or a weirdly empty grocery store makes you glad it’s there. Turns out most of it starts with food you already own.
Here’s the whole thing, start to finish.
Tips to Build an Emergency Food Supply
Here are some of the best ideas on how to build an emergency food supply:
1. Start With a Number
People walk into this backwards. They buy a cart of random cans and call it a stockpile.
Don’t. Pick a number first. The government floor is three days of food per person, which is fine for a short outage and useless for anything longer. So treat three days as step one, not the finish line. Then aim for two weeks. Then a month if you’ve got room.
Count everyone. Kids. The dog. That’s your real target, and now you’re shopping against a plan instead of a vibe.
2. Think in Two Layers
Here’s a mistake I made early on. I stocked nothing but rice and beans, felt very prepared, then realized two weeks of plain rice would break anyone’s spirit.
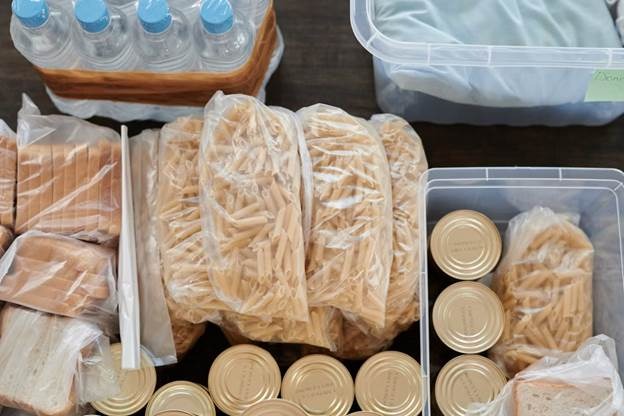
Your supply needs two layers. The big one is bulk staples. Rice, dried beans, oats, wheat. Cheapest calories you can buy, and they keep for decades if you pack them right. Most of your food and most of your budget lives here.
The smaller layer is variety. Canned veggies and meat, a few freeze-dried meals, the snacks your family actually reaches for. Sounds like a luxury. It isn’t. Two weeks into eating from a emergency food supply, that variety is the only thing keeping everyone from mutiny.
3. Buy the Right Foods
Some things last forever. Some quietly rot on you. Know the difference before you spend.
Long-lasting staples are the easy yes. White rice, dried beans, lentils, pasta, oats, powdered milk, salt, oil. Real meals, long shelf life. If you’re building meals around these, a little multi-course planning goes a long way toward keeping stockpile food from feeling like a punishment. Canned goods work too, with a catch most people miss. Acidic cans like tomatoes and fruit tap out around a year and a half. Vegetables and meat push to maybe five years. Handy for the short game, but don’t build your decade around them.
And a few things belong on the skip list unless you’ll eat them fast. Brown rice, whole wheat flour, nuts. They’ve got natural oils, and oils go rancid in months, not years.
Learned that one the hard way with a bag of whole wheat flour that smelled like old paint.
It’s also worth staying current on food recalls so you’re not stocking something that gets pulled from shelves a month later.
4. Use Top Quality Mylar Bags

This is the part that trips up almost everybody, and it’s the whole ballgame.
You can buy perfect food and ruin it with lazy storage. Paper sacks and flimsy plastic let in the four villains: oxygen, moisture, light, and bugs. Rice in its store bag? Year, maybe two. That exact same rice, stored right? Decades. Same rice. Different bag. That’s the entire trick.
For anything you’re keeping past six months, mylar bags for food storage are what the serious folks use, and for good reason. The foil shuts out light and moisture and drops oxygen way below what a plastic tub ever could.
You fill the bag, toss in an oxygen absorber, squeeze the air out, and seal the top with a clothes iron. A hair straightener works too, which sounds like a joke until you try it.
Do this, keep it cool, and white rice or dried beans will sit happy for twenty, thirty years.
5. Don’t Skip the Oxygen Absorbers
Sealing the bag isn’t enough on its own. There’s still air trapped in there, and that leftover oxygen is what kills your stockpile slowly.
Oxygen absorbers handle it. Little packets of iron powder that swallow the oxygen inside a sealed bag in a couple of hours, pulling it down to basically nothing.
No oxygen, no rancid fats, no bugs, because every insect and every egg needs air to survive. Sizing is simple enough. Small pouches want a 300cc absorber, big five-gallon bags want up to 2000cc.
If measurements aren’t your strong suit, this quick guide to kitchen conversions makes portioning bulk staples into bags a lot less fiddly. Get it right and your cheap staples outlast nearly everything else in the house.
6. Pick the Right Spot
Where you stash it matters just as much as how you seal it. People forget this and lose good food to a hot garage.
Heat is the killer. Every few degrees warmer roughly halves how long things keep. So think basement, interior closet, a cupboard nowhere near the stove or water heater. Below 75 and steady is the goal.
Dark helps, since light chews through nutrients and fats over time. Dry matters too, or you’ll get mold and rusty cans. Cool, dark, dry. Three words, and most houses have a corner that fits all three.
7. Rotate or Waste It
A stockpile you never touch just becomes a shelf of expired boxes. Ask me how I know.
Steal the rule every restaurant kitchen lives by. First in, first out. New cans go behind the old ones, you cook from the front, nothing sits forgotten.
Work your stored staples into regular dinners and top up as you go, so the food stays fresh and, honestly, familiar. Slap a date on everything. A two-minute inventory every few months tells you exactly what’s due for a refresh.
Final Thoughts
Strip it all down and a real emergency food supply is just a few honest moves.
Set a target, stack it in two layers, buy foods that genuinely last, and store them properly with good bags, oxygen absorbers, and a cool dark corner. Add a little rotation so nothing dies of neglect.
That’s it. That’s the whole system, sitting quiet in the background until the day it earns its keep.
Start this week with three days. Build from there. And the next time the lights go out, you won’t be standing in a dark kitchen counting crackers like I was.